Calculating For Fox Wedging
Fox wedging seems to be touched on as a theory of hidden mortise and tenoning with a concealed mechanical dynamic. How many actually use it probably numbers none or one or two worldwide in any given day. Mostly that is with good reason. In most cases, fox wedging is unusually used. Regular mortise and tenons of the obvious types take care of just about everything frame-wise. That's doors, windows, door frames, window frames, tables and chairs of every type. All in all, it is the single most used joint in the world. Adding a draw-bore pin increases the pullability strength and structure of the joint three-fold and more. The fox wedge is remarkably used in similar positions where it will counter specific types of pull, handles of all types, rails and so on. Of course, there is no true comparison between the two joint types. I am trying to imagine how much pounding pressure it would take to use a fox wedging on a timber-framed building with 12" (30.48mm) by 18" (457.2mm) beams, more than a mere wooden beetle or massive persuader, I think. For general furniture making and in the right place, this joint knows no equal. It can increase the integrity of a work incredibly when employed judiciously.
As mentioned, the fox-wedged mortise and tenon is rarely used but it is used as a rarer solution where pulling power is needed over long-term use. In almost all circumstances, it is used where the whole joint is to be hidden from view. Because of this, you are unlikely to ever see or even know such a joint type has ever been used let alone existed. I am using this joint in my upcoming project for an episode in the Sellers' Home series. It's not only a rare joint, the need for it is rarer still. I decided on it for a specific reason I will reveal in the video we film in the first week of the new year. I have four to do and I am looking forward to it. Anecdotally, I saw the joint used first when a door stile curved away from the shoulder of a super long rail in a massive gate for which no clamps were long enough. George, my then mentoring craftsman in my apprenticing days, cut the two saw kerfs and said, "Watch this!" When the joint and wedges were in place, he took a heavy sledge and pounded the stile until it seated to the shoulders. An amazing example of its efficacy!
Fox wedging can be used with or without any shoulders to the tenons, but shoulders add strength to the lateral stability of most M&T joinery, so I might suggest keeping them as stops and as added strength to your joints. For this instructional we will have two bare-faced edges to the tenons, so shoulders to two wider sides. This maximises wood where it is needed and the shouldered sides seat the joint and work as long-term lateral stabilizers.
The tenoned rail should be as dry as possible and it is worth drying on a radiator or other source of dry heat. Of course, it is not always necessary to dry down further than the relative humidity in the surrounding atmosphere in which the final piece made will live. I just like to take out all risk factors.
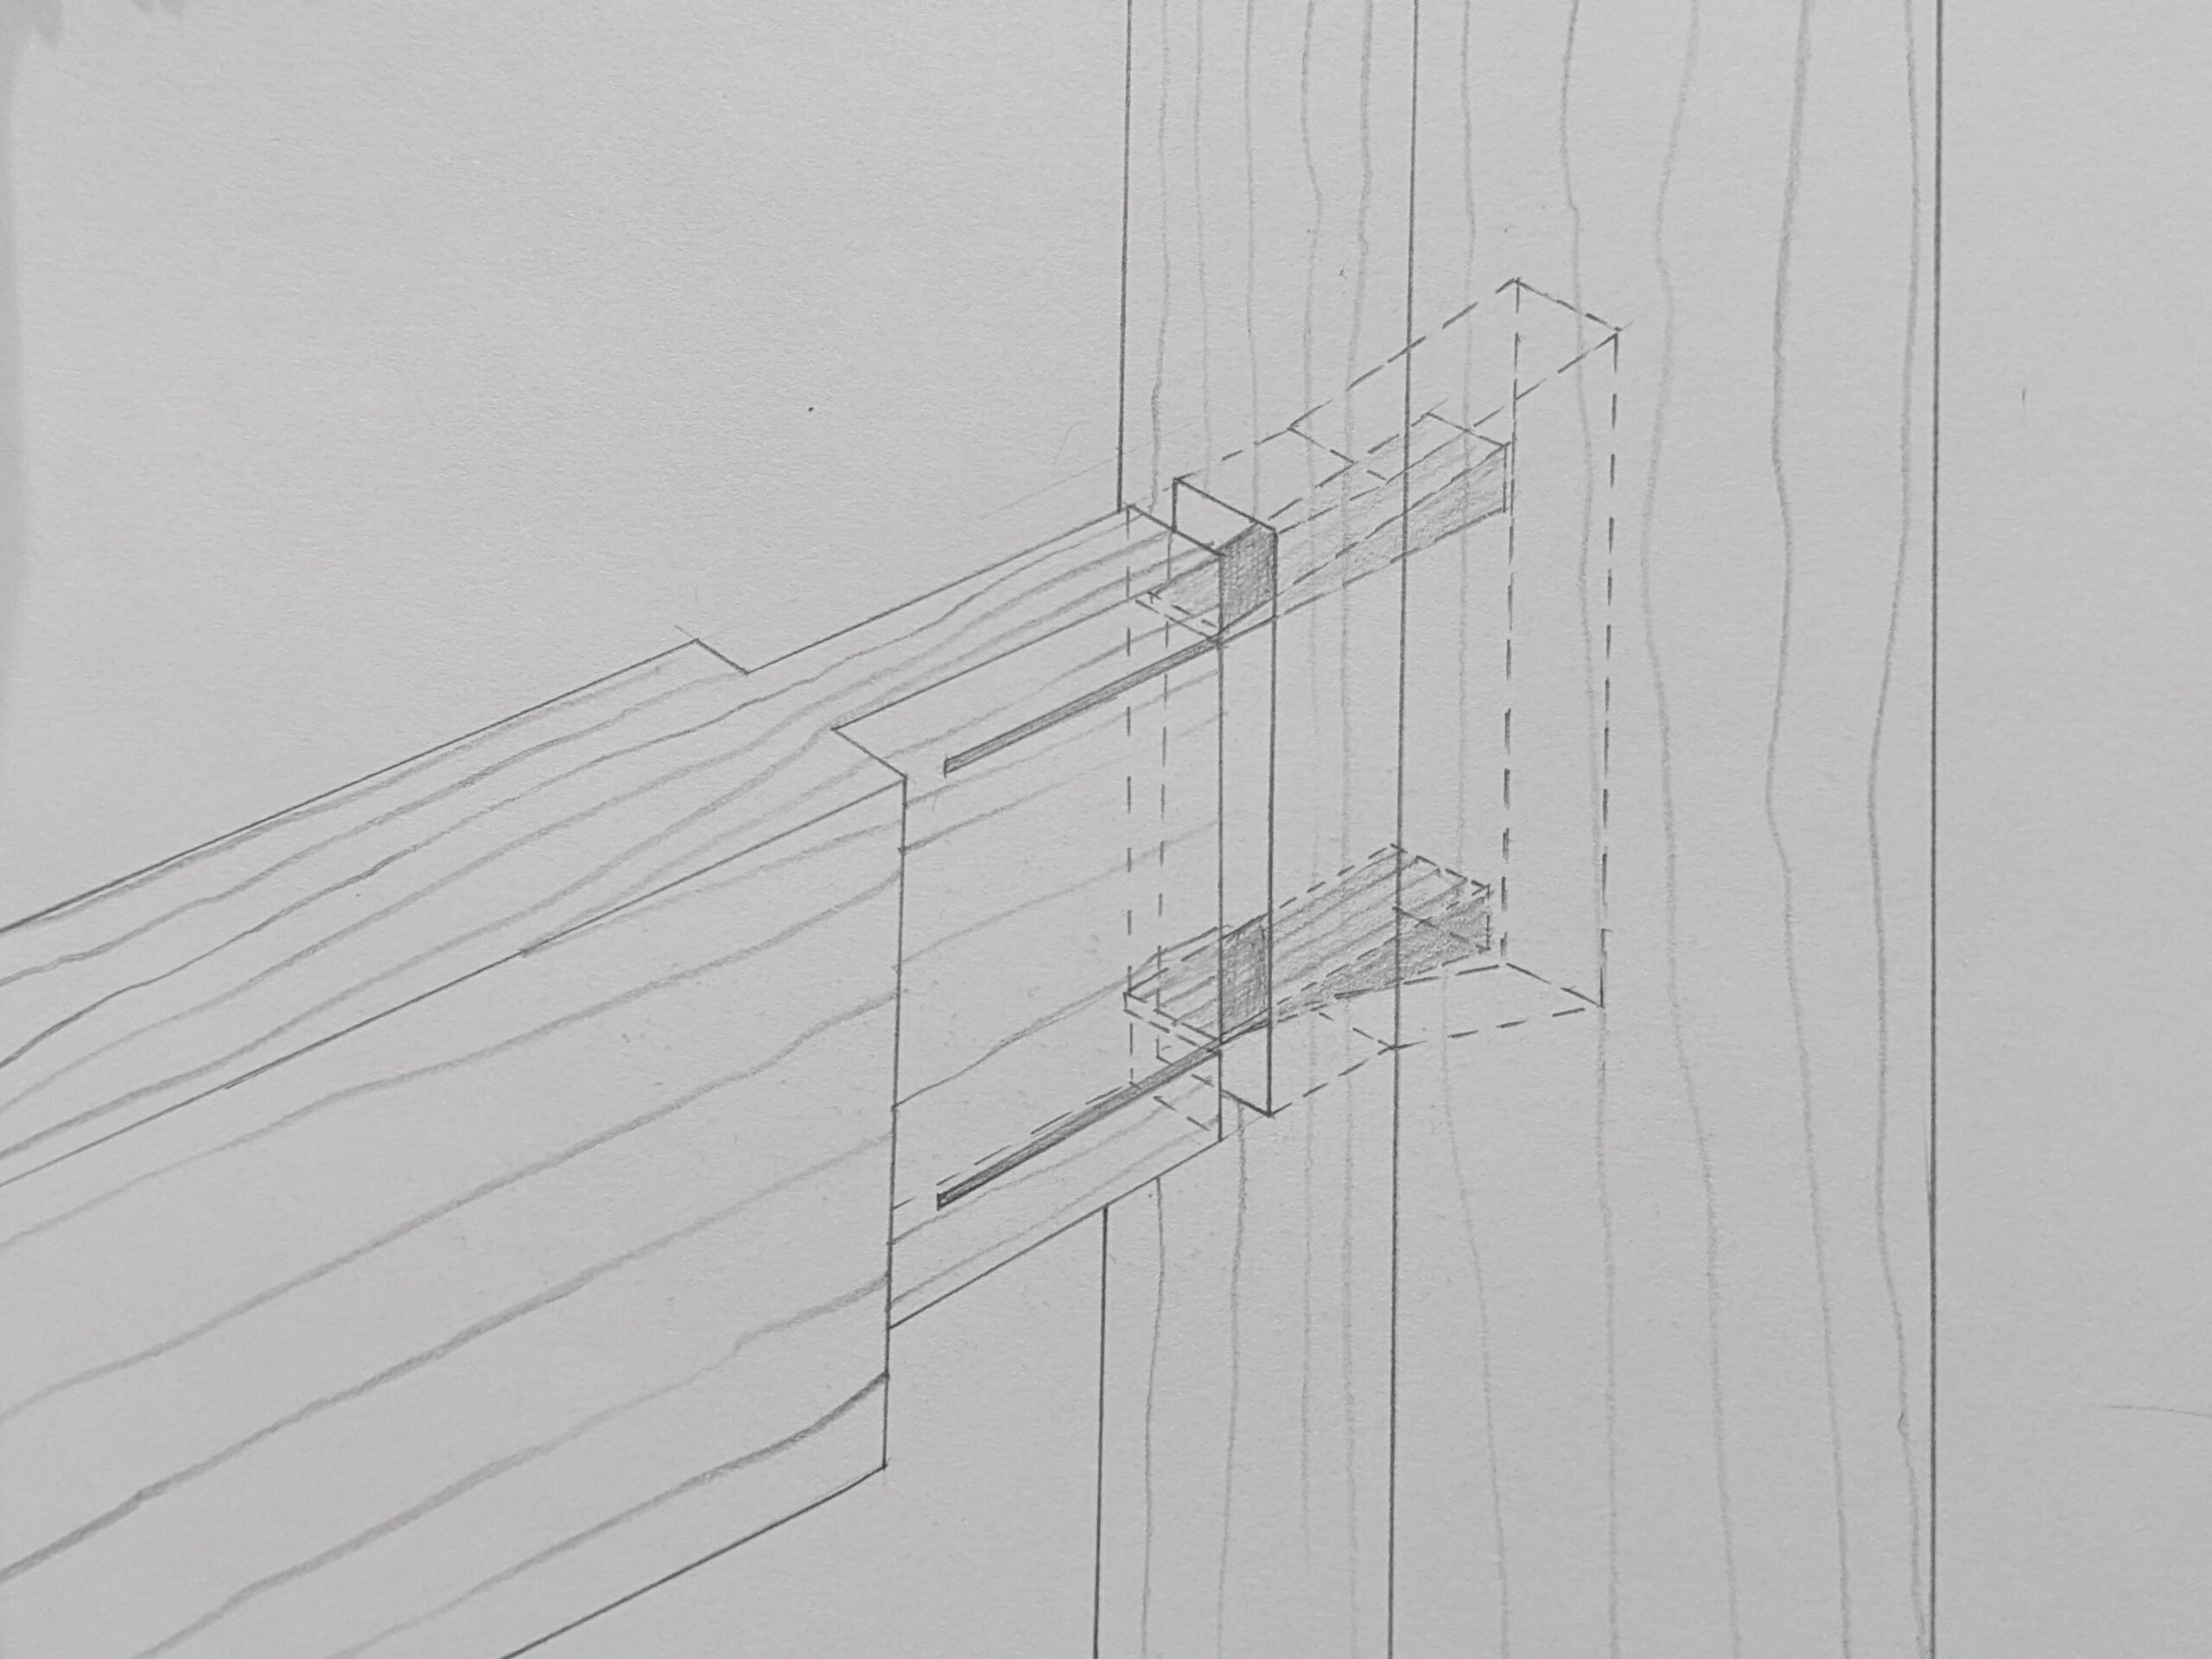
First, chop the mortise to the exact width of the tenon with no allowances to the wide width of the tenon. At the shoulder line, we want exactness. This will stop the wood from splitting as the wedges tighten when the tenon aspect of the joint seats fully against the mortise piece.
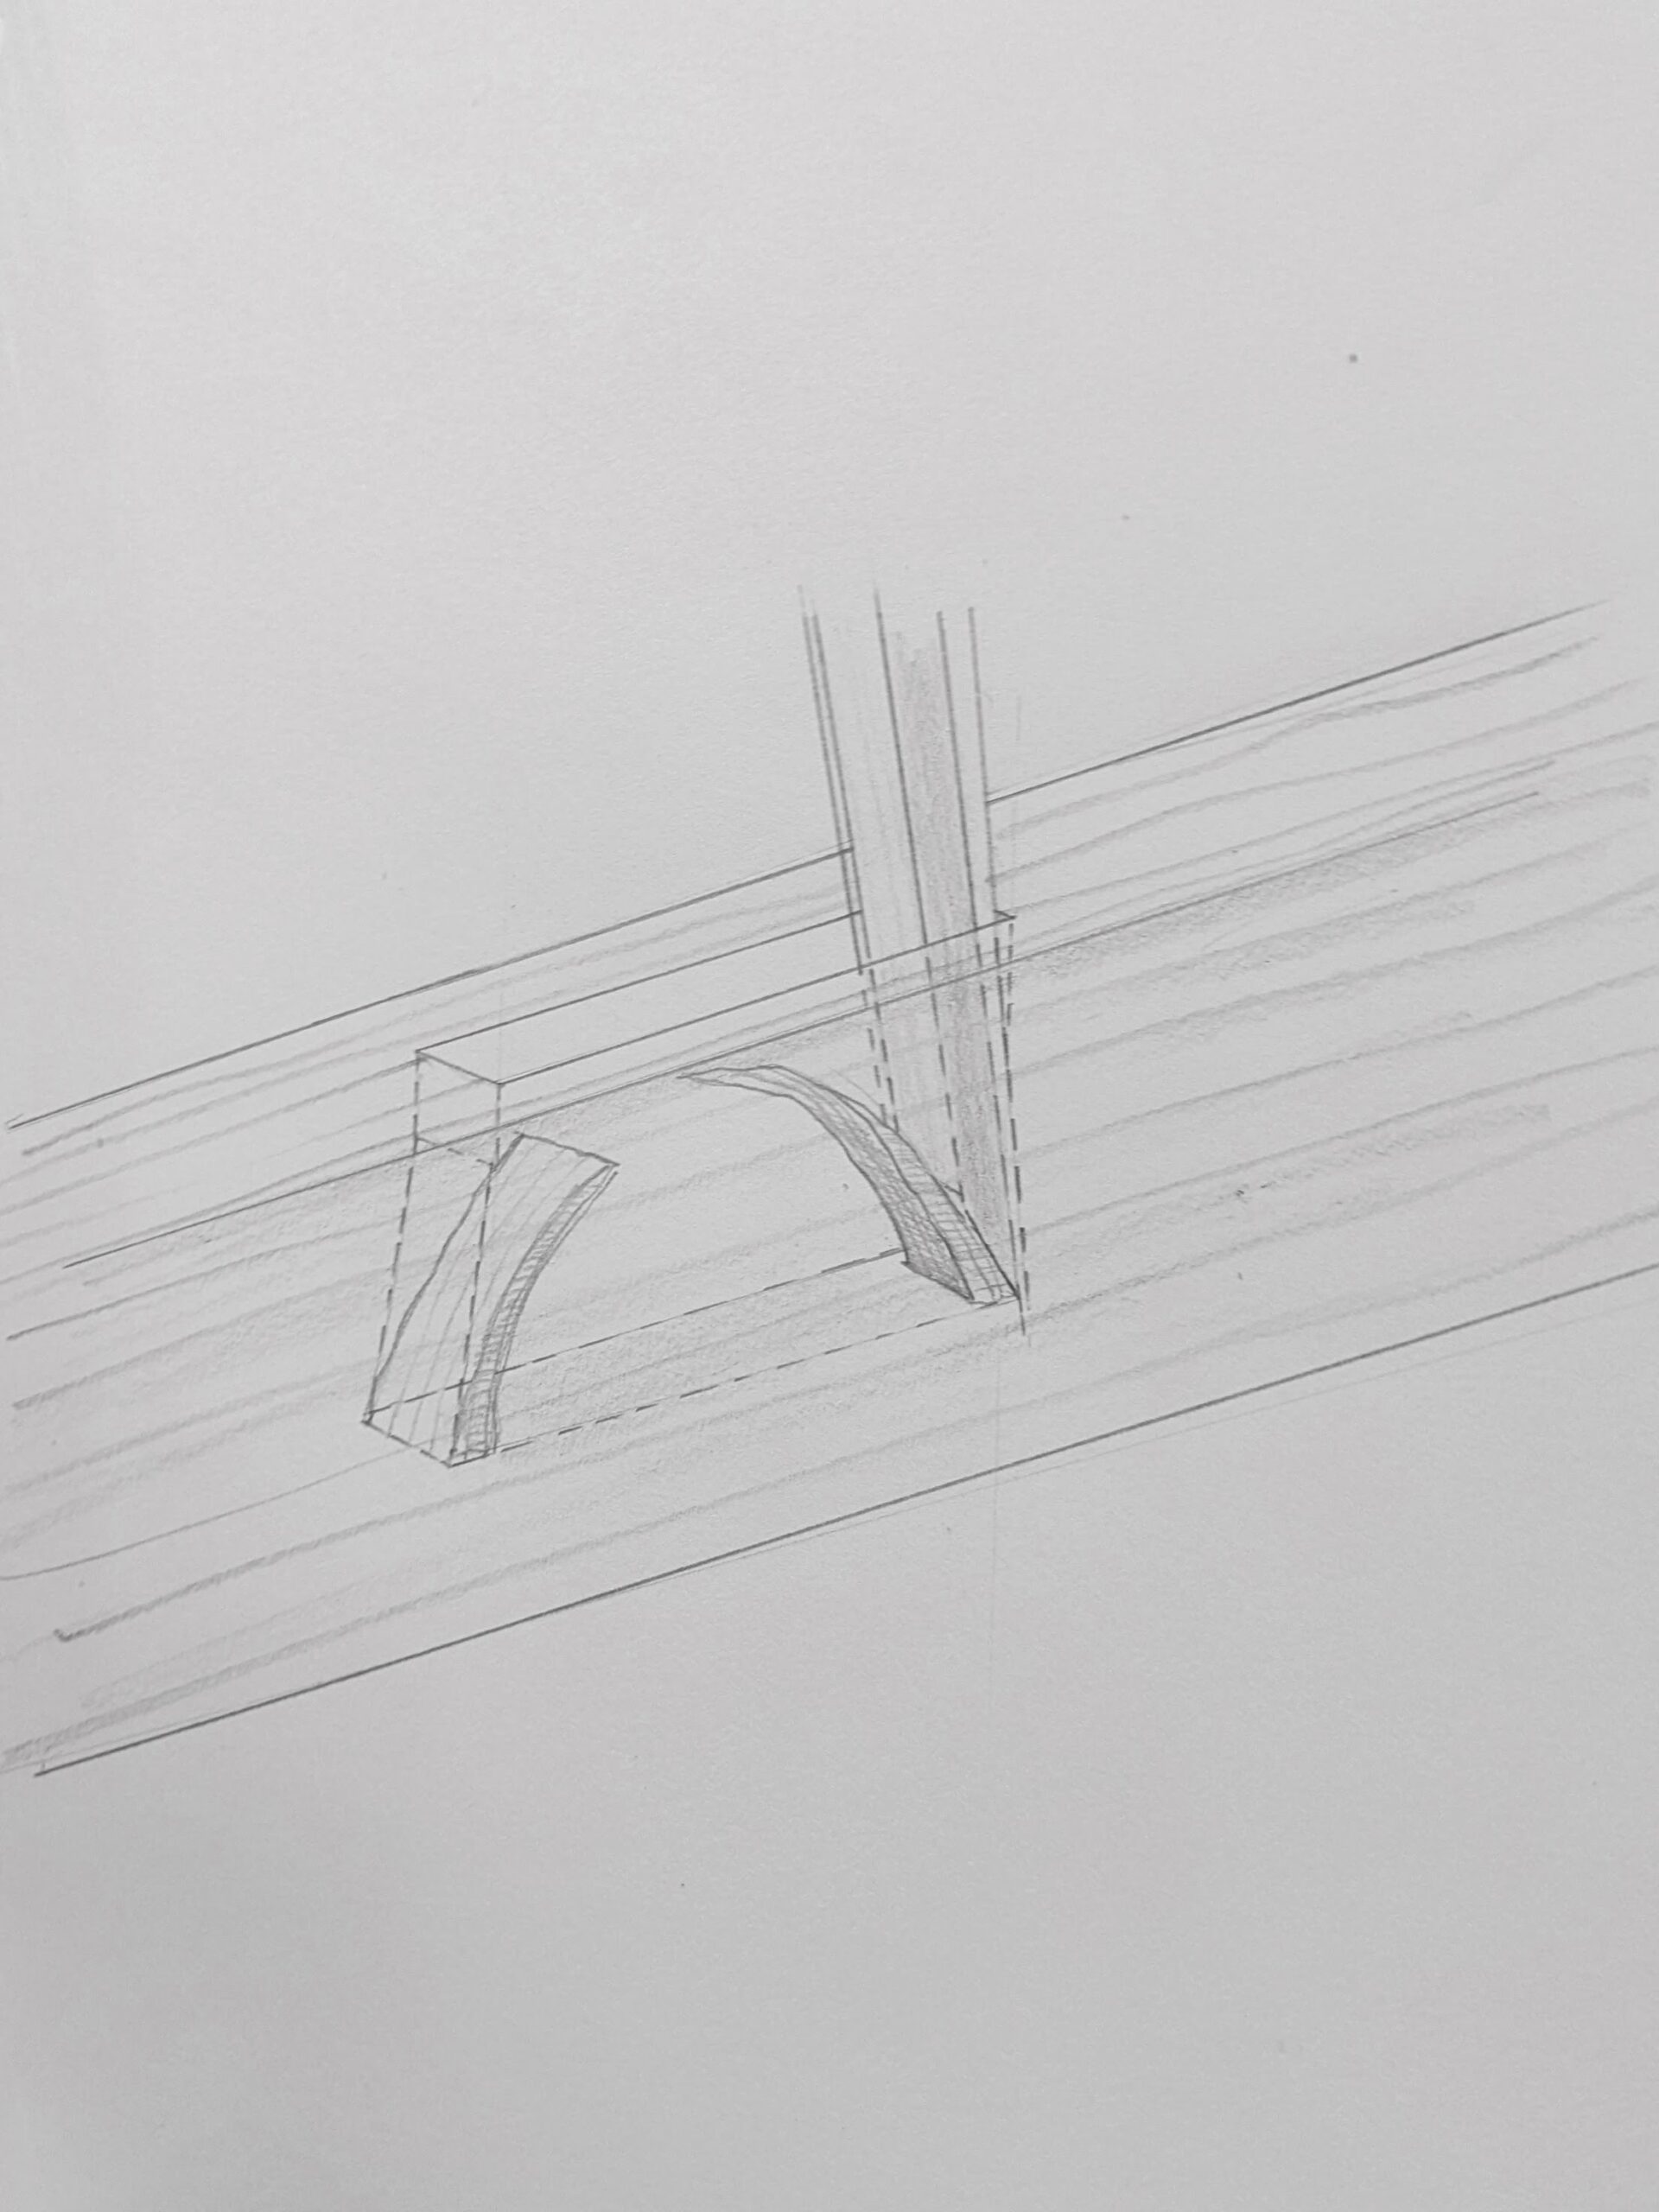
Inside the mortise, after you've chopped out the main mortise, pare down the end walls at an angle to gradually widen to the bottom of the mortise, giving room for the wedges to spread into the vacant space and so give it the dovetailed effect that the joint depends on. How much you widen these end areas depends on the length of the tenon. Longer tenons flare out more readily than shorter ones which will offer greater resistance to spreading. In furniture work, we generally keep stopped or non-through mortise and tenons to a reasonable length. An apron to table leg for an average dining table for instance generally needs the M&T to be no longer or deeper than 2" (50.8mm).
Whether you use one or two wedges depends on the width of the tenon. Narrower tenons can often be widened with a single wedge centered in the tenon. That said, I have noticed a tendency for single, centred wedges to show traces of a split into the visible wood outside the tenon. This is not usually detrimental to the strength by weakening the joint. The reason it happens revolves mainly around the compression surrounding the wood. `even when the joint is cut tightly between the end walls, that wood does yield, especially in less dense woods like oak and the wide range of soft-grained woods. I would suggest that tenons with a width of 1" (25.4mm)or less a single wedge will work just fine. This can work fine on wider widths depending on the wood type. Many woods are known more individually for their pliability and this will help you determine whether one or two will work in your project. Oak is especially known for both its pliability and its strength and bending properties. Other hardwoods are known to fracture more readily under compression and across the grain and will prove unsuitable. There is, of course, no particular formula. The distance from the edge of the tenon will mostly depend on the bendability of the wood and how you decide how far from the edge will be no more than a good guesstimate. You must look at your wood and make the decision for the best position to make your saw kerf, but, that said, I would say that almost any position will do except going too close to the edge.
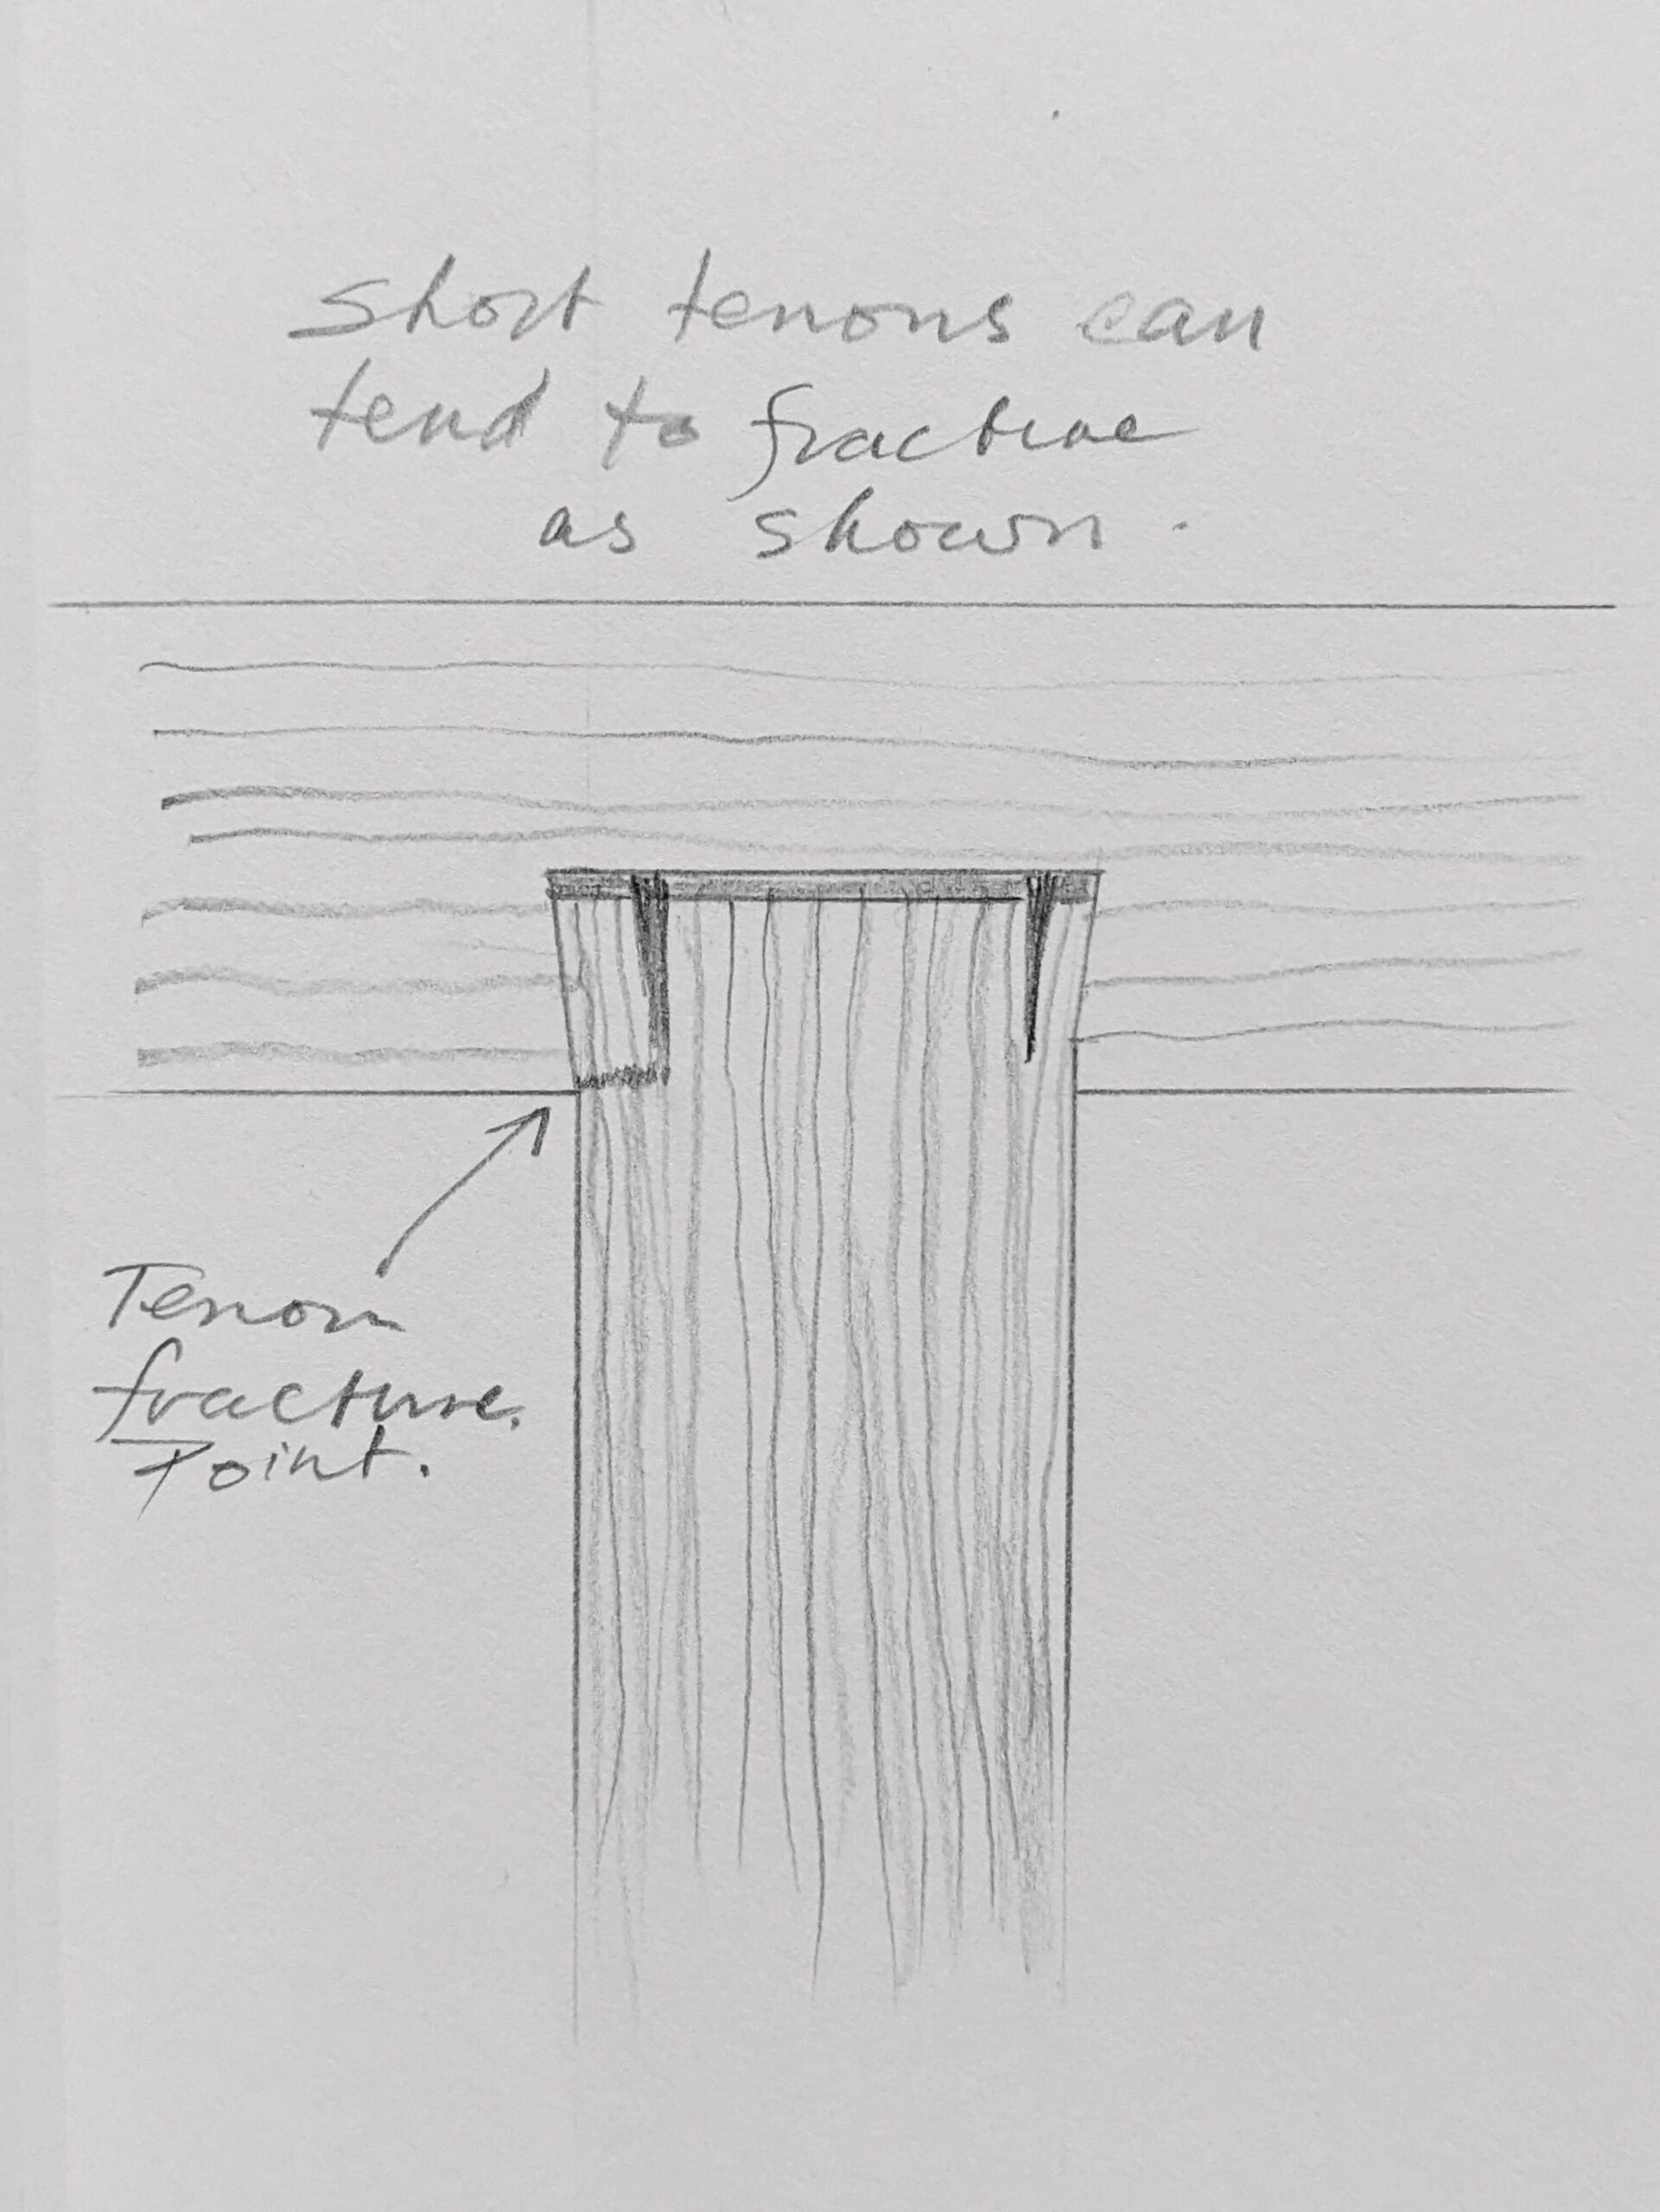
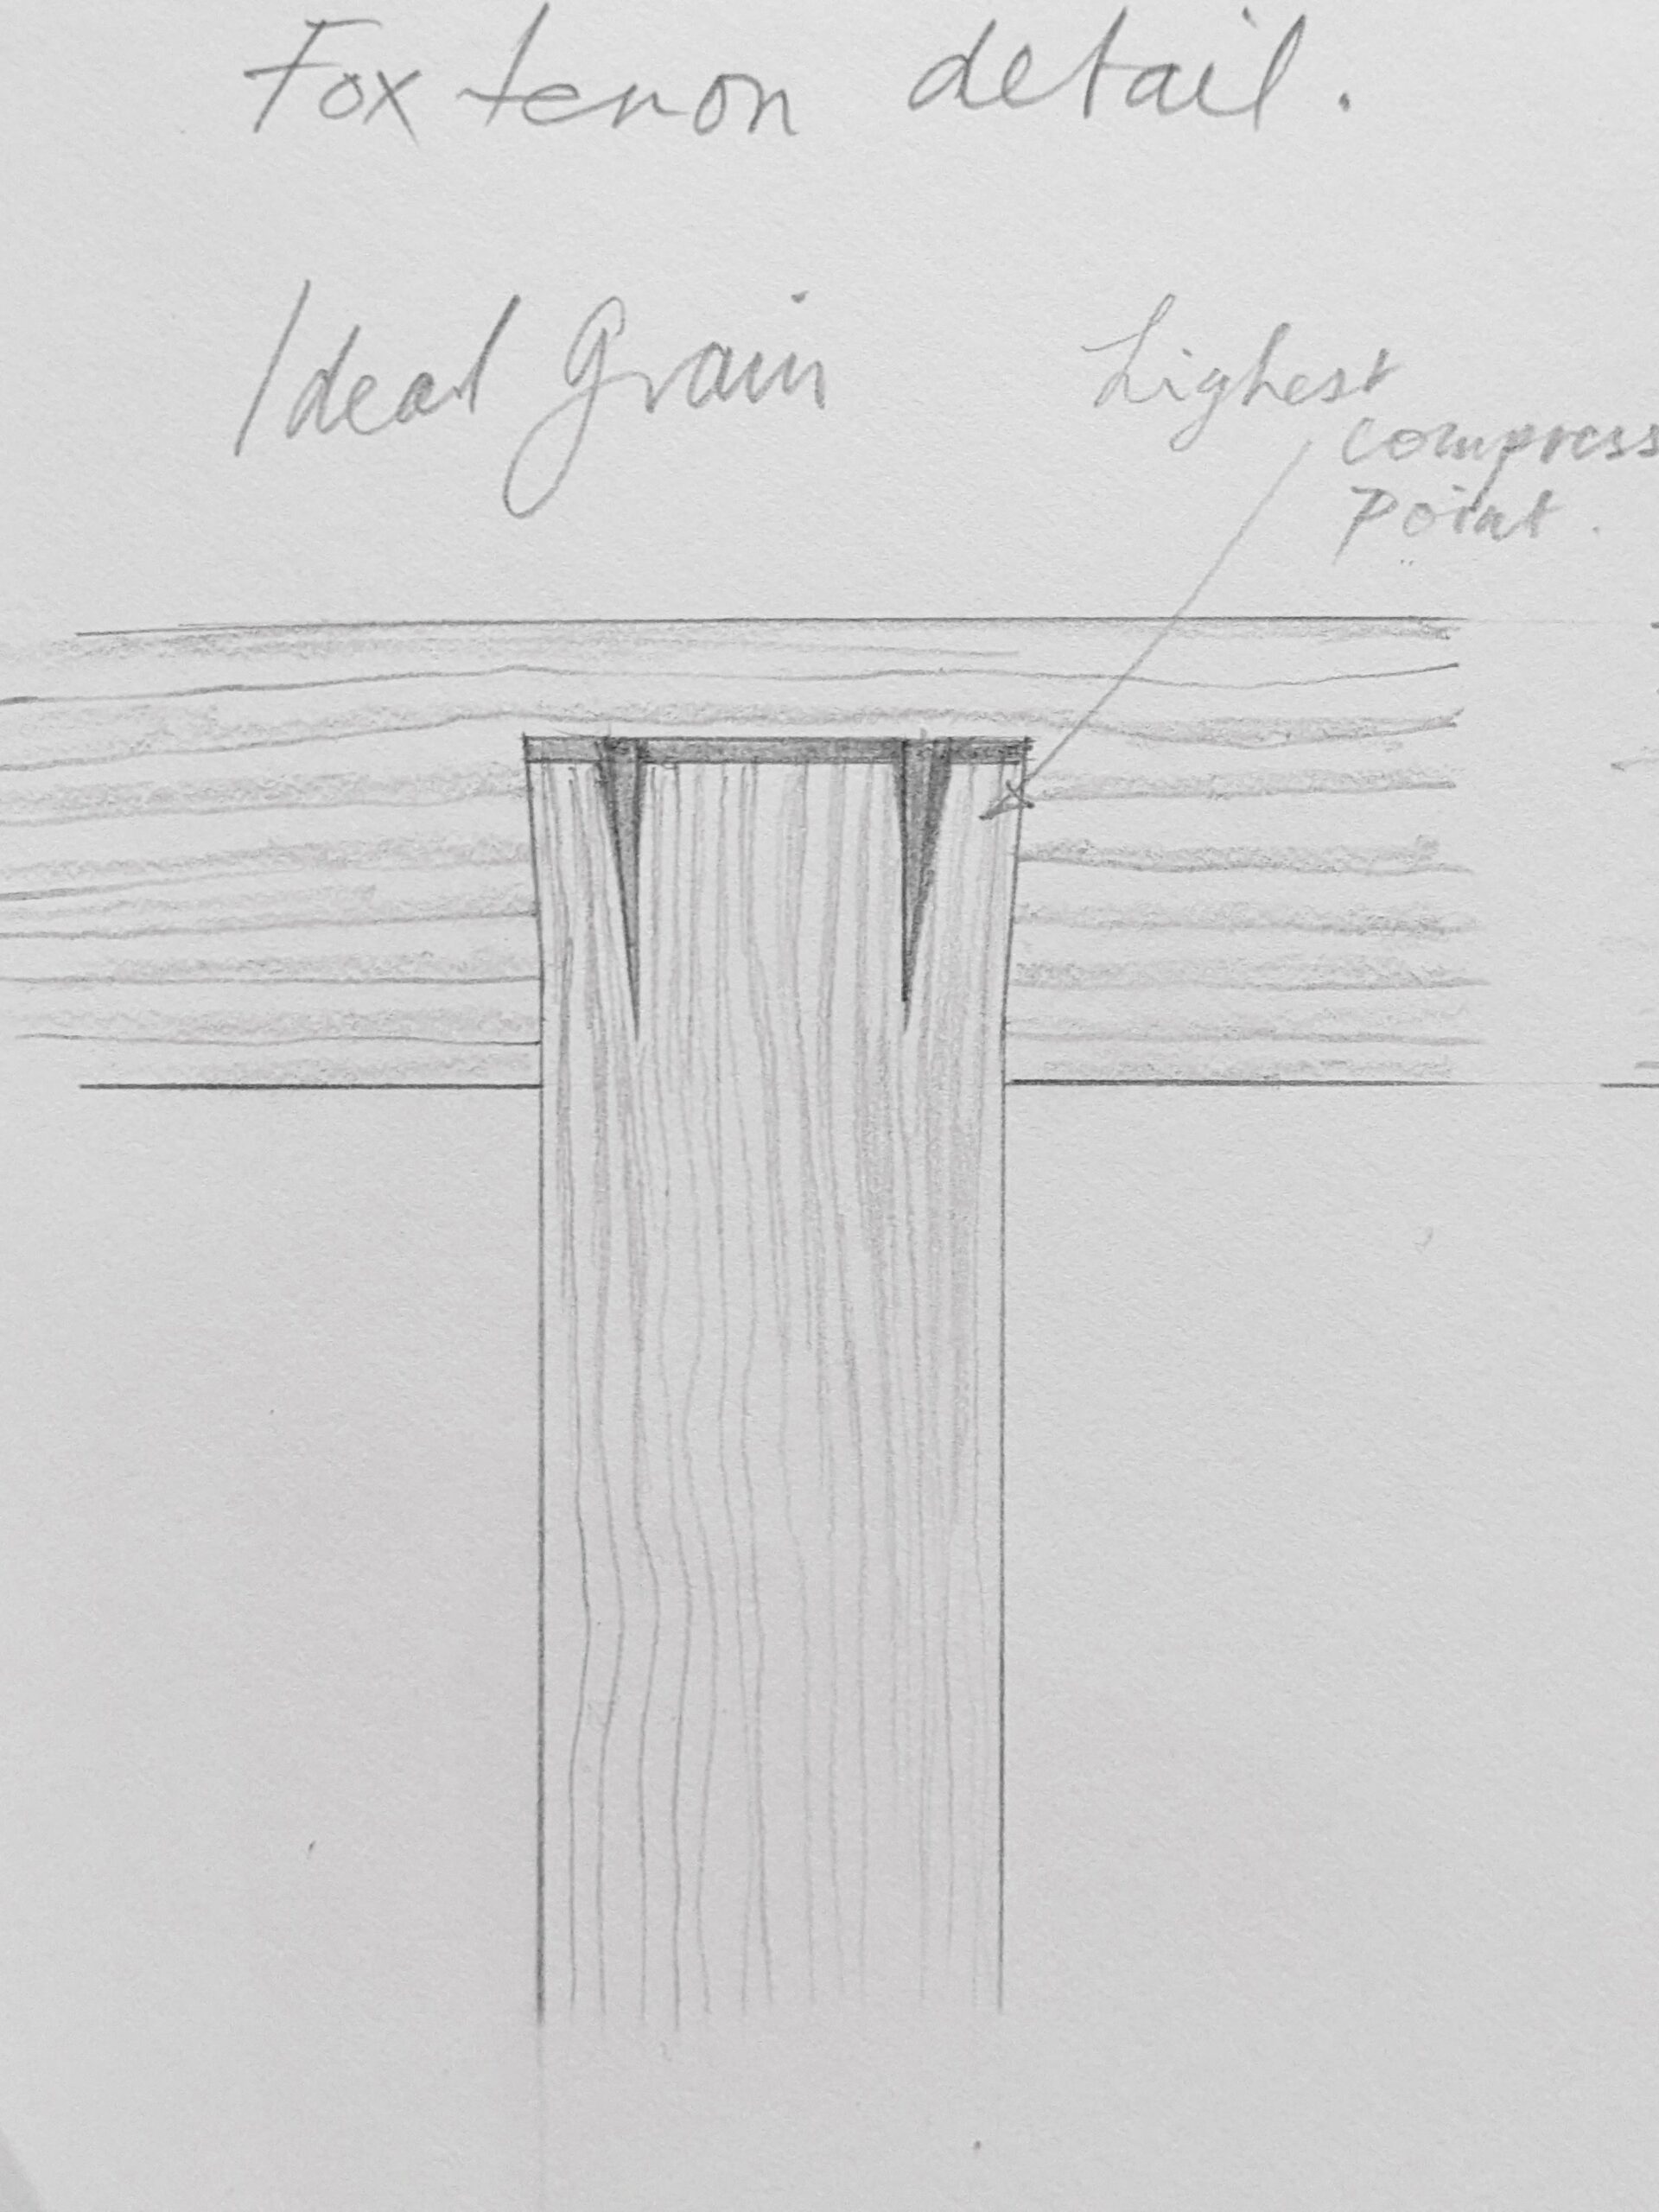
Key to a good fox wedging of the tenon is straight, knot-free, non-fractious grain in the tenon area. You are looking for continuous grain run extending through the tenon into the grain beyond the joint area and the reason for this is that you want the wood to remain intact inside the mortise hole itself. Short grain will usually break and within the joint, you will have lost the integrity if the wood is split off from the tenon. When this happens, you rely on glue alone, which may well hold, but the idea of the joint is to create additional mechanical strength within the wood and the whole joint -- integrity -- integrated, whole, complete. The real issue here though is that you may well not know this has happened.
There are advocates for using small holes at the end of the saw kerf to work as stops to stop the wood from splitting. I can't say I am an advocate of this though I can see how it works. My preference is to keep as much grain as possible. Any amount of reduction increases weakness at the critical area of stress. This is the reason I make sure to increase the wall at the ends of the mortise hole as a 'retainer wall' of resistance to prevent any splitting. It works in that I have never had a split occur.
Calculating what will take place inside the joint can depend on the wood type, its compressibility, strength, and more. The necessary first calculation is the space you create in widening the bottom of the mortise. You should not only fill the space by creating a wedge commensurate to the space you created but any additional space for compression in the 'spring' from the wedges themselves, which will compress under driving pressure and then too the same spring in the tenon too.
The saw kerf will likely be somewhere around 1/32" (.79mm) per kerf. With two kerfs we have 1/16" (1.57mm). If the bottom of the mortise is widened on each side by 3/32" (2.3mm) then we have 3/16" (4.7mm) plus the kerfs, so, technically a wedge of 1/8" (3.1mm) for each wedge will close off the gap to each side. But that's the theory. In reality, there are resistance factors in the wood fibre of both tenon and wedge. This is where the guestimation comes into play and this is what creates a little uncertainty. Usually, we use the same wood we created the joint from -- oak for oak and pine for pine. We can use hard and dense woods such as we have in scraps. My feeling on this is that glue forms a less certain bond to harder, more dense-grained woods with less compressibility. I have no proof of this and it doesn't matter that much. The joints will hold just fine with like for like woods so I see no general need to get into this.
In my YouTube video showing my use of this tenon type, the wedges at their widest point totaled a full 1/2" (12.7mm) to fill the total available space of just 5/16" (7.9mm) see pic above. This is in only a 1" (25.4mm) wide tenon. The substantive compression of components is clear and so too any pressure points. Notice how much the wedges compressed at the wide end of the wedges within the saw kerfs and then not in the short distance near the uncompressed ends. Now notice how much the outer sides of the tenon narrowed to look as though they were cut tapered when they were cut perfectly parallel to the outer edge. It's good to see additional areas like the ends of the wedges indenting into the bottom of the mortise and the retention properties afforded adjacent to the extended area on either side of the mortise opening. Though we never cut through a section as I did, it is comforting to see just how the wedges work to both compress the wood fibres and also close off any and all relevant air pockets and that there is zero splitting.
Comments ()