Rethinking the Future from Past Experience
When I learned to sharpen a saw the first time the result was acceptable but mostly this was because my saw was new and it was a first time sharpening for me and it. The process seemed simple enough because it was a ripcut saw and the teeth are sharpened square across with the file passing at 90-degrees to the saw plate in both plains. The gullet itself fixed the angle so it was mostly governed by this. Unfortunately, not much emphasis was given with regards to length of stroke and downward pressure, both of which must have measured control. Over the months my saw teeth began to develop large and small teeth alongside one another. Too much offset pressure resulted in gain to one tooth and loss next door to the adjacent one or ones. But it was by this that I learned.
I recall buying a Japanese saw file for the first time. I thought it's slender profile in the shape of a diamond pattern made it an unusually lovely tool. Passing it into each gullet, the teeth offered little resistance because of the relative angle to the plate on pull-stroke saws. This was 30 years ago. I found the task simple enough and soon the saw was sharp again. This was my first encounter with a Japanese saw. It was at that time that the hard-point saws began to gain increased credibility because they eliminated any need for sharpening. . . forever. In those days disposing of things seemed always destined for the so-called landfill. It should have been called land pollution but that is just my view. Back then no one had recycle bins that I ever recall seeing. Of course recycle does minimise waste and the same steel can be reconstituted. I still will always question the making of saws with built in disposability. It's such a sad day, yet for most, it's seen as something, well, just easy and clever. I learned to sharpen a saw by just repeating the practice and not giving up until I got it right. I think that if I can learn to sharpen a saw, most people can too!
A few years ago I introduced a new concept for my ripcut saws and that was to add a third bevel in the form of a strengthening bevel to the rear of the saw teeth. I had started to do this some years previously because I wondered if the teeth would stay sharper with the added back support to the fore-edge. It works well and takes but a few minutes. Now then, you don't need to do this just after you have sharpened the saw because you do have a good cutting. I did do it the first time to test out my theory. I had just sharpened my saw and then added the back-bevel. It worked!
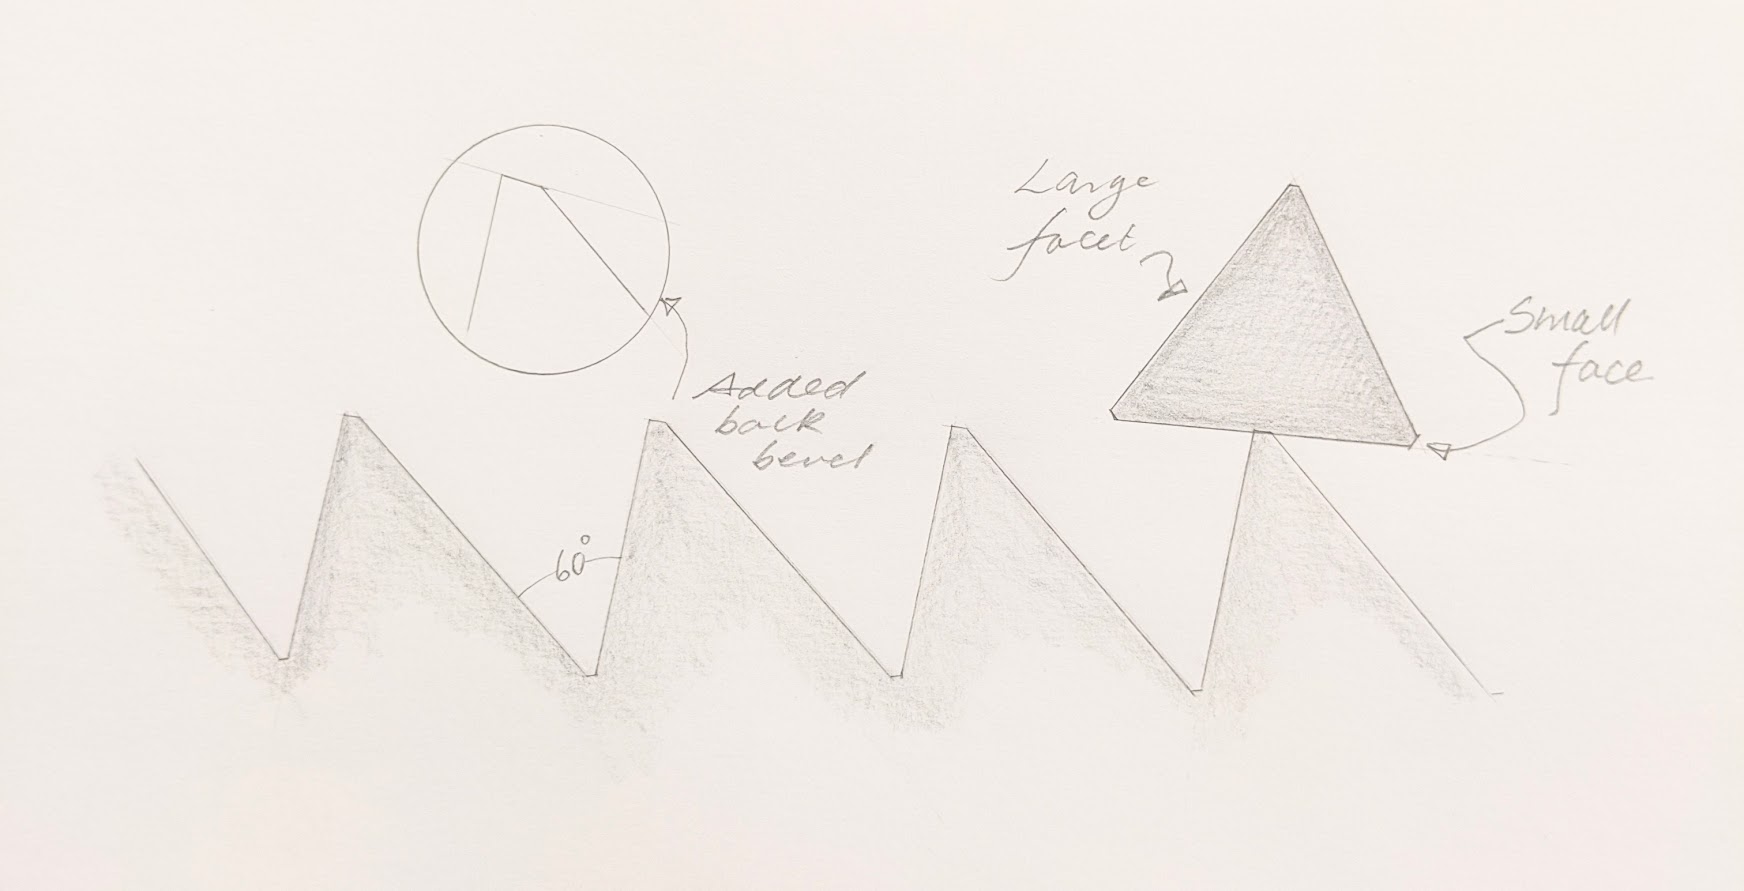
Having never seen or heard of this being done before I felt something of an adventurer -- a sort of defying tradition on the one hand and then on the other, totally accepting of them and my standing on the shoulders of giants who went before me. What happens is simple enough. I sharpened the gullets of the rip with a single pass through the gullet at a measured length and hand weight. This regulated the depth of cut to the steel and ensured the teeth stay the same height. Once done, I passed the file onto the tip of each of the teeth at an angle as shown in the drawing to create the back bevel I wanted. You must take care not to take it down too much as you rely on the edge to guide your filing. This too was a mere single pass stroke of very light hand weight. As if you are somehow just stroking the tooth. There is no force used and if anything I am suspending the file across the tip to take off the barest amount. Even so, this results in a flat plain about .75mm wide. This is enough not to do again for about five standard sharpenings. On very fine-toothed saws, this is a little less easy because of the size and the width of the saw file. I'd say it's not worth eye-strain or the effort doing it to teeth 18 PPI or more. On 16 PPI and less, it is definitely worth the extra pass as it is literally two minutes' work.
Another consideration is one I use from time to time and that is to simply repeat the third bevel rather than both gullet sides to the front and back of the teeth. This effectively sharpens the key edge and corners to the teeth and of course the 'chisel edge'. You can do this three or four times with light-handed passes. Ultimately you will take the gullet down again with conventional filing to reestablish the full-depth gullet again.
I say all of this because saw sharpening is worthy of consideration and who knows what innovative concepts might emerge. Another point to ponder (pun intended) is the file teeth themselves. Most people refer to a saw file as a three-sided file when in reality they are six-sided--three main wide ones and three narrow. Funnily enough, it's not the wide ones that generally limit the life span of a saw file but the three less-noticed narrow facets. These are the ones that stop the file from cutting because the narrow 'corners' fracture much more quickly than the wider faces and once they are damaged they prevent the file from reaching the side faces with the larger cutting surfaces and thus deepening the cut is in fact impossible. That said, if you take a fine hacksaw blade, like the ones used in junior hacksaws, you can run a single pass into the 'V' of the gullet, and then the file will cut just fine. This is not a bad thing to do as it lengthens the life of the file altogether. It's not quite so pretty but it works well and saw sharpening goes quickly for several sharpening after that initial gullet treatment.
Comments ()