Building Bookshelves on woodworkingmasterclasses.com
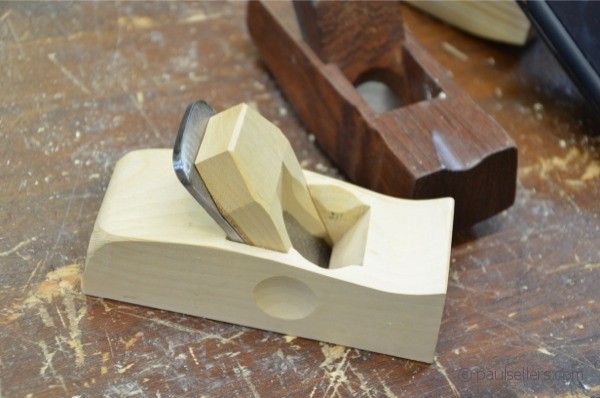
We have just completed the series on making wooden planes; primarily because we needed a special hollowing plane to shape the seat of our last project which was making a customised workbench stool to suit the bench you work at and of course your height for a stool. In the process we featured a traditionally carved seat, which was a scalloped out bottom-shape for added comfort.

For those of you following our courses on woodworkringmasterclasses.com we are about to start releasing the weekly broadcast on Building Bookshelves. I have added several features for developing skills and techniques. Whereas we could just use thicker stock, and indeed of you wish to do so you can change the dimensions to suit your desires, I have chosen my wood so that you can walk into any supplier and pretty much buy it off the shelf. When I refer to sizes such as 1 x 12 or 1 x 3, these sizes will be nominal and unless you have machining capability, you will need to adjust the sizes accordingly. In the UK, 1″ stock is nominally sizes at 21mm which is 13/16″. This is close to but not exactly what you get in the US. This is not too helpful internationally. In the US, for instance, 2″ stock is nominally downsized after machining to 1 1/2″ or 38mm. 1″ stock will be around 18mm. But the idea is to help the majority wherever they are in the world who have no ability to alter the thickness of wider boards. It is impractical to plane down a 1″ board 12″ wide for so large a project using hand planes. B&Q may not be the best place to get started with wood but it may be all that you have access to. Hime Depot likewise although they do have decent premium boards to select from. To get you a head start on materials the cutting list is given below.
Materials
Part # Qty Description Size
1 2 Side pieces 21mm x 280mm x 1831mm
2 4 Shelf 21mm x 280mm x 882mm
3 1 Top 21mm x 255mm x 978mm
4 1 Top arch 21mm x 70mm x 882mm
5 1 Bottom arch 21mm x 70mm x 940mm
6 1 Kick board 21mm x 70mm x 882mm
7 2. Divider. 21mm x 200mm x 392mm
Back face frame
8 2 Stile 28mm x 70mm x 1820mm
9 5 Cross rail 28mm x 70mm x 864mm
10 1 Top rail 28mm x 70mm x 998mm
11 13 T&G panel (optional) 7.5mm x 70mm 22m lin (metres)*
*Panel material
You may want to buy pre made T&G boarding rather than making your own. If you want to make your own you will need enough material to cover an area of 1.85 sq meters 0r 18 sq ft
For my panelling I will be using 12mm (1/2″) stock with a 3/16″ T&G. That means that the actual coverage is the width of the board less the width of the tongue 7mm (5/16″). If you follow this paneling for this project you will need:
22 linear metres or 73 linear feet of 12mm x 62mm T&G.
The tools you will need are:
Combination square
Chisel set
Chisel hammer or mallet
Combination gauge
Knife
Hand router (you can use a poor man’s router)
Tape measure
Tenon saw
Tongue and Groove planes or Plough plane or Rabbet plane (to be discussed)
The joints we are making are:
Through housing dado
Stopped housing dado
Mortise and tenon joint (through)
Mortise and tenon joint (stopped)
Mortise and tenon joint (stub)
Mortise and tenon joint (haunched)
Techniques and methods
We will be discussing face frames for added lateral stability to case goods using mortise and tenon frame construction.
We will be developing four types of mortise and tenon joints including the through mortise and tenon joint developed for Arts & Crafts joinery. We will be discussing the theories behind the use of this joint and the wider issues of why this joint was developed in the way it was.
Panelling using hand-made lapped and/or tongue and groove panelling and the bead- and vee-jointed features commonly used on this type of panelling. Don’t worry, you will not need the screw stemmed Marples plough plane, we will be using another type as well as showing you how this one works too!
We have added a coved mould to crown the top of the bookshelf unit that could be made from an existing moulding plane, but I will be using the methods shown in the plane making videos just featured on woodworkingmasterclasses to get the exact shape we want and we show you how to install stops that will guarantee accurate cove shaping.
Comments ()