Fine Woodworking - Debunking Myths and Mysteries on Cabinet Scrapers
Answering the needs in real woodworking realms
Onward then from myth-busting in our age of increasing mass-informed misinformation.
The multi-point questioning I presented here a few days ago about an article featured in Fine Woodworking July/August issue caused a bit of an unexpected spin and my hope was, is and always will be to counter any misinformation before it became another one of those internationally accepted facts that has no real basis but seemed a good idea-smart to us at the time. From time to time we all get something wrong and I am no different. When this happens it’s important to see its origin and ask where it came from. This kind of authority needs questioning in the sense of its authority. Here are some examples. On woodworking planes people now call the cap iron a chip breaker and this includes some very well informed guru's in the field including some makers themselves. Here's another; for at least three decades people resorted to a mass of information surrounding micro-bevel sharpening, thinking in the end that that was the only way to go when in fact it has many negative influences on the work not the least of which is that edge fracture happens more quickly and the type of bevel it creates is not really of very great value to us real woodworkers that work the tools and not machines. Showing the chisel chiselling the end of a piece of softwood has no real value except to show that immediately after it's sharpening it is in fact sharp. That's no different than the edge you get from free-handing a convex bevel, which is faster and more efficient. Another emerging reality follows exponents stating bench heights are determined from the crease in the front or back of the wrist. No one really heard of that as a guide before recent years and thousands of woodworkers following this advice now have back, neck and other physical problems. I just looked at yet another blog where the guys are below waste height planing and straining their backs to do it. More on this in a new and controversial release soon, but these kinds of things are worrying and they creep in inch by inch and yard by yard so I thought it best to counter what was said with fact so that people don’t believe that these scrapers cannot create pristine surfaces or that you need to sharpen your scraper a certain way or that you must hone bevels to 16,000 grit to get an edge that won’t produce a surface that doesn’t need correction with 240-grit sand paper. We’ll tackle them in the order I presented them so that we can see exactly what we need for sharpening and using bench cabinet scrapers.
Cabinet scraper- simple, effective and unequalled
Those of you who read my blog know that I read a recent Fine Woodworking article plainly stating that, “You Need a Cabinet Scraper". It became one of those articles you first skim over and then you look back in surprise to see if what you read was really in print and that you weren’t mistaken in how you took it.
Q #1) The cabinet scraper is “the best tool for cleaning up tearout before final smoothing”
Answer:
This statement suggests that the next step is the card scraper and that you need sandpaper to improve the work of the cabinet scraper. This seems to have become something of a common thread of late. You should be able to get the same results with the cabinet scraper as you get with the so-called card scraper. Though you may not believe it and you may not know it, but sandpaper is always used by craftsmen to roughen the surface and not smooth it. We use more sandpaper today than ever before in the history of woodworking as a direct result of NOT having the skills to sharpen and use cabinet scrapers and planes, which is to remove flawed surfaces made by machines. Especially is this statement questionable if you hone and turn the edge after using 16,000 abrasion. Skilled hand tool craftsmen and women use sandpaper to give ‘tooth’ to an otherwise too smooth and finished surface resulting from planes and scrapers. Most often the surface is severely dulled and takes on a ‘flat’ look after sanding.
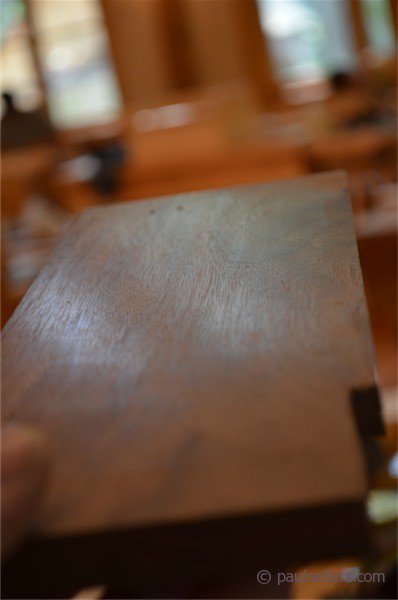
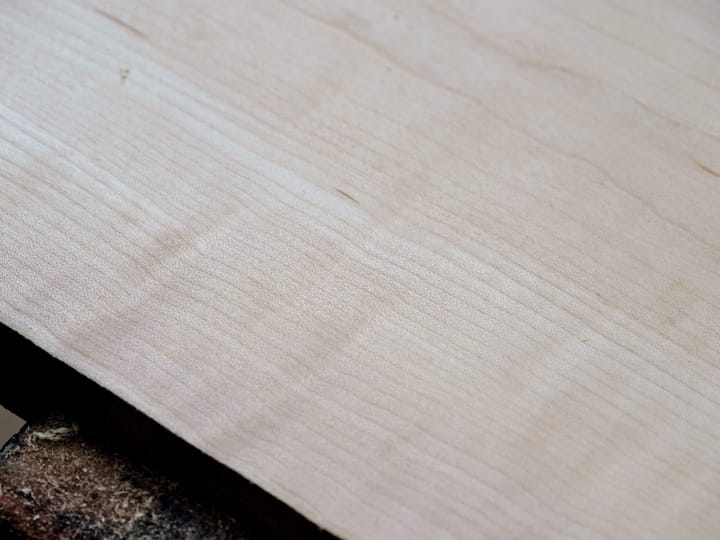
What this and most if not all other articles has failed to identify is that the wood type itself plays a major part in what kind of finish you can get with the cabinet scraper. The cabinet scraper relies on a firmness, density and closeness of grain structure for it to work properly. We’ll discuss this shortly, but soft woods cannot generally support the pressure of the type of cut you get from a turned cutting edge of the type used in cabinet and card scrapers.
Example of different grades of hardeness in one piece of wood
Solid hard, heartwood left, (superbly smooth and flawless). Softer, slightly spalted and degraded section (not quite so smooth but still smooth). Soft sapwood (fuzzy and in need of refinement).

Q #2) Using the (cabinet) scraper hardens the edge too much to allow you to re-turn the edge.
Answer:
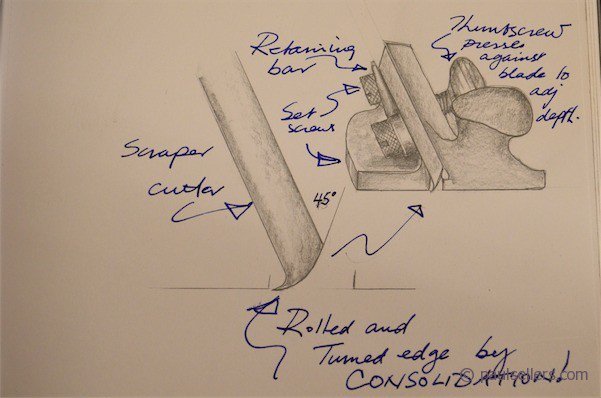
I never heard of this before so I would be interested in some support that shows this as fact. Even so, this is not the reason that we generally cannot re-turn the edge on the cabinet scraper blade. The bona fide reason you cannot re-turn the edge is due to the developed angle following the 45-degree bevel. Trying to re-turn the edge causes it to fracture along the now turned bevel in the same way cowboy-cutting wire by bending it back and forth causes wire or nails to break. As I said previously, stating that the work of “using the scraper hardens the edge too much” doesn’t mean that what’s being said is true. The edge becomes naturally brittle from consolidation and burnishing as the cutting edge is being formed with the ticketer (UK) also known as a burnisher.
Important note:
The author leaves out one key aspect of sharpening the scraper blade that we call consolidation. Using the burnisher or ticketer, we press the hardened steel rod hard down on the large face and move the burnisher back and forth heavily to consolidate the steel into itself as shown. This process sounds like a ticketing machine used to count tickets given on buses in the UK, hence the terms we say, 'ticket', 'ticketer' and 'ticketing'. So, consolidation,the process we use on the blade, compels the steel into itself to give better edge retention, better ability to take and make a keen edge and at the same time 'iron out' any and all strait ions left from filing and abroad ing. An exceptionally critical step.
Also, the author doesn't explains that polishing the larger flat face is a once in a lifetime procedure and that it is unnecessary to repeat this as part of the sharpening process in future sharpenings.
#3 The cabinet scraper blade will not fit into a honing guide because the blade is too big for the guide.
Answer:
As can be seen here, almost all cabinet scraper blades fit perfectly into many if not all honing guides. There are some older ones that won't, but generally they will.
Q #4) Unlike the more familiar card scraper, the cabinet scraper is not made to leave a finished surface.
Answer:
a) The card scraper and cabinet scraper are equally well-known by woodworkers worldwide. I don't think I have ever met a woodworker that didn't know both types.

b) I think that is more generally not true that the cabinet scraper is not made to leave a finished surface, however some woods scrape to a very poor level because of softness, grain structure and so on. Most domestic European and continental American hard woods with dense, even grain together with hardwoods including and especially tropical or exotic hardwoods will finish to a very high level of quality whereby almost all abrasion would indeed roughen not improve the surface. I have always used them to create pristine, glass-like surfaces so smooth that they need roughening with 240 grit sandpaper so that they will indeed take a finish. That is, they must be roughened to actually give tooth to the wood by actually cutting and tearing the surface by the abrasion sandpaper gives, which is exactly what we need for some if not most finishes.
The two examples shown here are African mahogany and American walnut
Q #5) They are used to remove jointer and planer marks and tracks left by hand planes.
Answer:
Yes, we use scrapers of both types to do this and also to remove to the machine marks, skud marks and even the occasional chatter but not tracks left by hand planes really. Machines especially always leave the telltale marks of the rotary cut on the surface of woods worked by machines such as routers, planers, jointers and circular saws of every type. As a boy and throughout my life it has always been a fact that all surfaces must be planed and scraped before they leave the shop.
If planes leave tracks it's a result of the tool's cutting edge being misaligned and mis-set, which as I said previously is not the really the way of the artisan.
Q #6) It’s a bit of a quirky tool.
answer:
I have found the tool simple to understand and use and without fail seems always ready to work. Problems arise in two main areas; the cutting edge can be over-turned and under-turned so that it is not presented to the wood properly when installed in the body of the scraper.
Q #7) The blade looks like a card scraper.
Answer:
It in fact looks nothing like a card scraper, but more like a shortened, double-edged plane iron.
Q #8) That the card scraper can leave divots in the surface of the wood.
Answer:
No, this really doesn’t happen and it can be very difficult to do that. You would have to be using it pretty badly to do that. Perhaps dig a corner in or something like that.
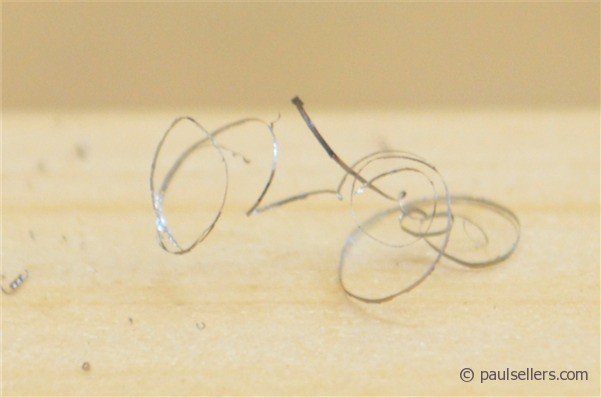
Q #9) The author says he will show you how to take nice shavings.
Answer:
Perhaps I am being pedantic here, but shavings are secondary to planing or scraping wood smooth and have little to do with the work in hand. What people need to know is how to make a presentable surface that reflects competent handling of the tool and it’s that that the author says cannot be achieved with this tool.
Q #10) The author states honing through four stone grades 1,000, 5,000, 8,000, and to 16,000 is generally the necessary procedure to gain a highly polished edge.
Answer:
This could be very expensive and is not absolutely necessary for most scraper sharpening. Stones to around 1,000-1,200 should prove sufficient when followed by consolidation, polishing and burnishing. The consolidation step to the steel blade is something he has left out of the article and this is a critical procedure many writers now leave out of the sharpening strategy.
Important note:
You may not realise this, but you can sharpen scrapers to a very decent cutting edge straight from the file if you burnish the bevel edge sufficiently, almost if not to the same level as fine honing the bevel. Most of us do this for speed. it's very effective and practical.
Q #11) Burnishing the bevel makes for a sharper edge.
Answer:
That’s true, the question for me is whether the four stones were indeed necessary beyond the initial polishing when also states that several strokes back and forth across the bevel flattens out scratches left from honing. 16,000 grit is a super high level to polish to.
Q #12) The author uses the point of his burnisher to retrieve what seems to be an intentionally overturned edge.
Answer:
It’s best to turn it rightly first off the bat, which is very simple to do. Burnishers are simple tools made from hardened steel. I find oval shaped ones give me variability for different types of scrapers.
Q #13) Set up for fluffy shavings.
Answer: Fluffy and nice shavings may be a byproduct of having a good cutting edge that cuts the surface dead smooth, which is what people are really looking for in their scrapers. Describing fluffy shavings is a bit like looking at the fluffy feathers after you just butchered the chicken for the oven.
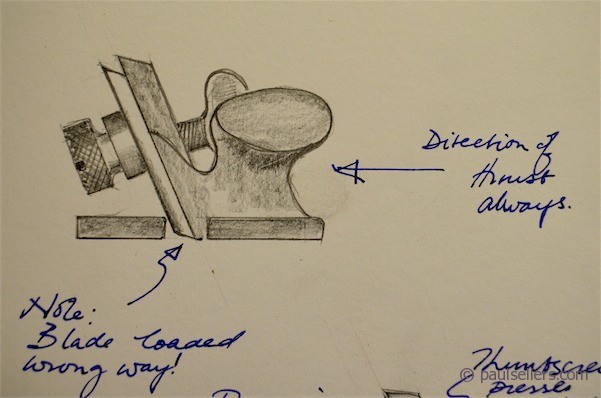
Q #14) Put the blade into the scraper body from beneath, with the hook facing toward the depth adjustment thumbscrew.
This drawing shows the effective position of the blade housed the wrong way in the cabinet scraper
Answer:
You can put the blade through from the top or bottom, but you must simply take care not to damage the newly turned and formed edge through rough handling during installation. "with the hook facing toward the depth adjustment thumbscrew."
I think this was just a major blunder here, but a genuine mistake. We all do it. This advice is wrong, so never do it. It’s utterly the wrong way around to put the blade back to front and backwards this way.There will be an ear-piercing scream...
The editors should indeed have caught this.
This drawing shows the blade installed correctly.
The Fine Woodworking illustration needs a mgnifying glass to identify what they do actually show as the right way.
Q #15) With the scraper on your bench, press down on the blade so it’s bottoming out on the bench.
Answer:
Bench surfaces would need to be hard and dead flat; better a harder surface of well planed wood, plastic laminate, MDF or some other such surface because it must bel level and flat.
Q #16) You can buy a burnisher like this from (Philip C) Lowe for $65.
Answer:
$65 seems a lot to pay for a burnisher. Don’t feel that this is at all necessary to sharpen a scraper. There are ways to make burnishes from a 3/8" steel rod and you can use such things as drill bits and the backs of gouges and screwdrivers. I hate to think that anyone would think that they must have an expensive tool just to get the edge on a scraper.
Q #17) The author reiterates, “The cabinet scraper isn’t meant to produce a finished surface and you’ll be smoothing afterward.”
Answer:
The cabinet scraper is indeed meant to create a finished surface and you can rely on it if you are armed with a few more truths about the tool, sharpness, using the tool,
and most of all the wood
Q #18 The writer describes the scraper as a plane.
Answer:
This could be another mistake, but the scraper is still called a scraper even though scraper is a great misleading misnomer too. It really isn’t a plane.
Steps to Sharpening the Cabinet Scraper
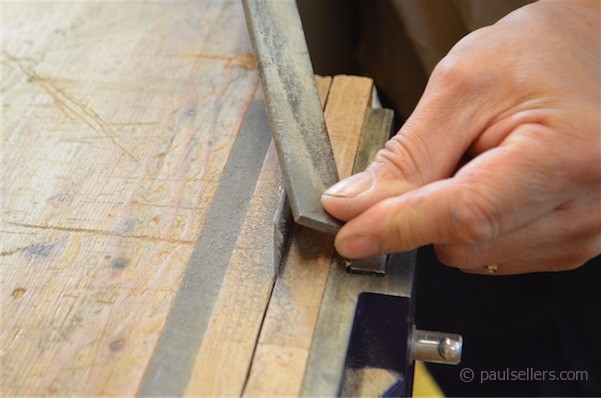
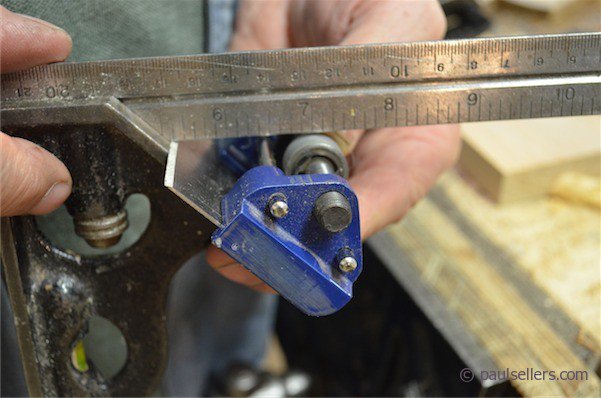
File out the previous and now fractured blade edge at 45-degrees. This is not a critical angle and 40-50-degrees will work. You can eyeball and check yourself , or install the cutting iron into a honing guide and fine tune to around 1200 grit, which is fine.
Draw filing removes long wire edges that coil like this
Refine the bevel edge on sharpening stones if you have them. Follow the angle you filed at as closely as possible. Going through various grits is quicker, but if you have only one, that will do too.
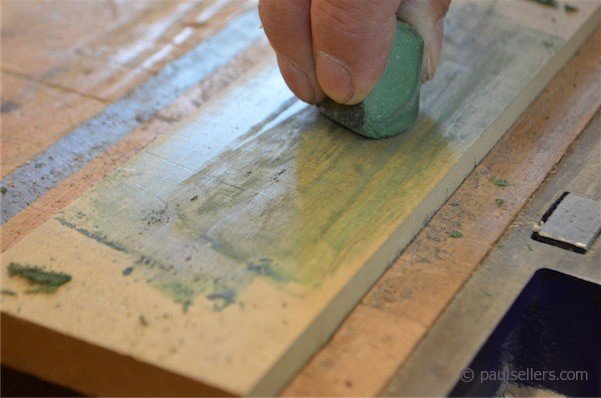
Hone of a piece of wood or MDF charged with buffing compound. I am using steel buffing compound at 15,000 here. Be consistent. You do not want a rounded or double bevel here.
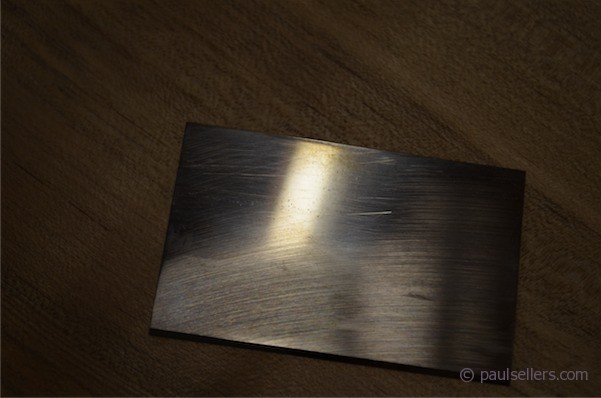
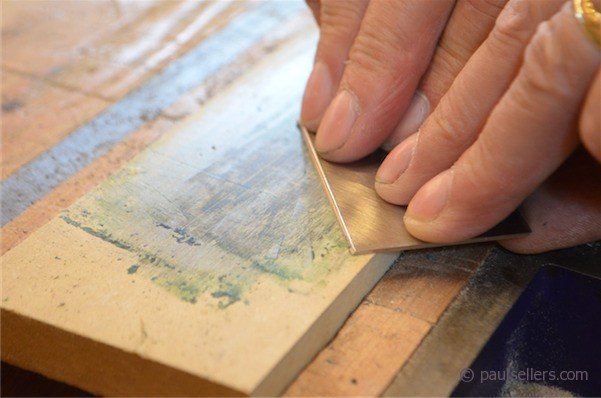
Buff out the flat face to as high a polish as you can. This is a one shot deal and generally will remain polished for the remainder of the blades life. YOU DO NOT NEED TO DO THIS AGAIN. That said, you will in general remove the filed bur on the strop or board charged with compound, but this is only to remove the burr.
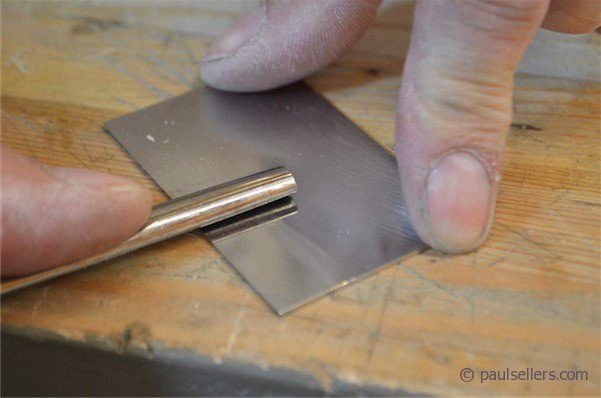
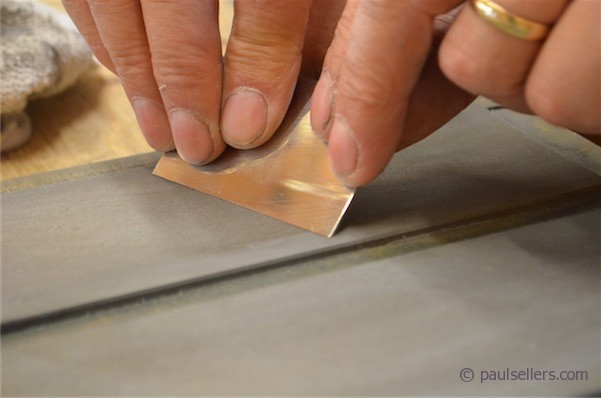
CONSOLIDATE the steel by ticketing the back of the blade, that's the large flat face. Move it back and forth across the cutting edge but keeping the ticketer (burnisher) dead flat. This simple act presses the steel into itself and further removes superficial scratches that would otherwise affect the developed edge.
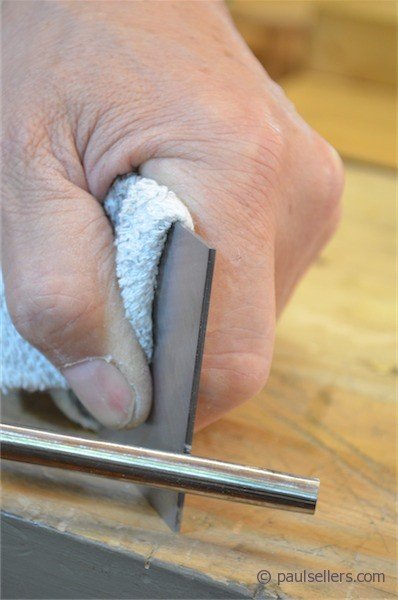
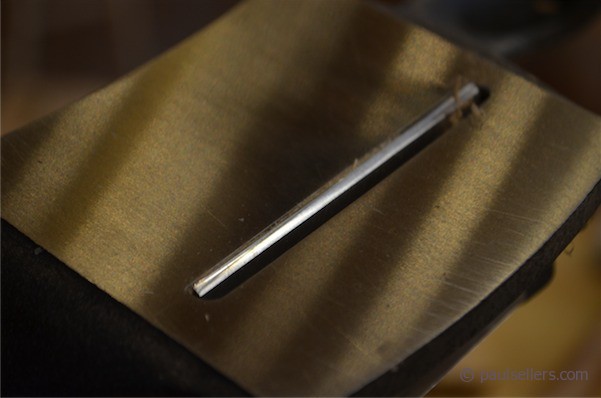
Turn the blade on its edge and wrap with a cloth for protection. Pull the burnisher up from the bottom, pressing as hard as you con to again consolidate the steel into itself. Start at the same bevel angle as you have in the blade - usually 45-degrees. After about thirty strokes consolidating, start to roll the edge with each consecutive stroke until the burnisher is just under 90-degrees to the axis of the scraper.
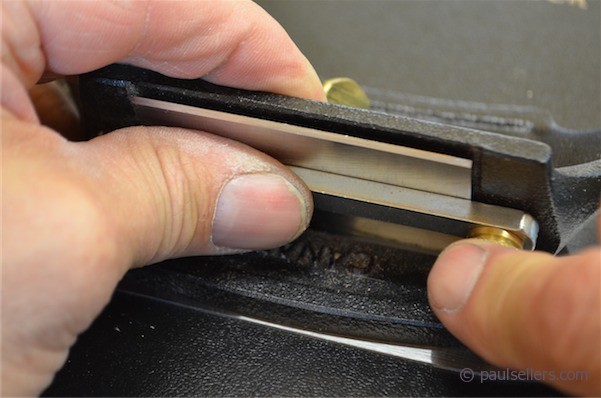
Install the blade from above or below carefully so as not to damage the newly formed edge. One thing you must make sure of is that the thumbscrew that adjusts the blade is not protruding through the back of the body of the scraper. You will adjust this later.
Pinch the retainer bar so that the blade is sandwiched evenly between the scraper body and the bar yet the blade is levelled at the bottom mouth of the scraper. Cinch up the screws evenly so no gaps are left to either side.
Turn the thumbscrew till it just touches the back of the blade and test on wood. Turn to adjust depth of cut.
Comments ()