Making the Paul Sellers' tool cabinet - Bottom unit
Hey Paul,
I just wanted to send this email to you again. I am not sure you had a chance to read it the first time.
We have conversed via email several times over the past year. I had been an attorney here in the US for several years and recently quit my job to fulfill my love for woodworking. The change has had its difficult moments, but has been amazing. You have helped me through this passage and I am grateful. The online woodworking classes have also been amazing.
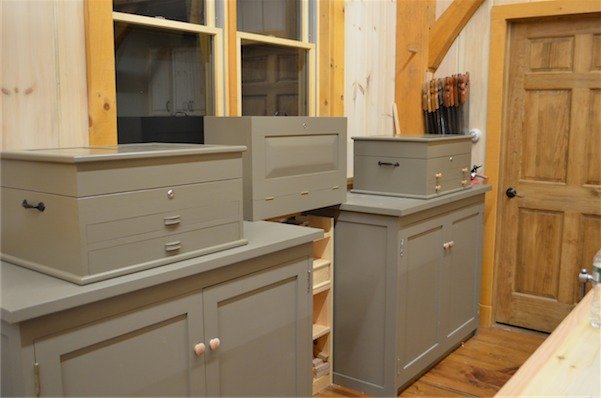
The next project appears to be a tool chest. I am excited to make the tool chest but would love to also make the cabinet your chests sit on. Six months ago I attempted to make a cabinet for my tools but failed as my skills and ability to design such a cabinet were inadequate. I would love to make a storage cabinet for my tool chest to sit on, much like the ones in your workshop.
I know the main structure is frame and panel construction and that you purchased the wood from Home Depot (I believe Home Depot calls it whitewood (superstrips 1" x 4" x 8')). I was wondering if you could write up a post on your blog or email me about the construction of these cabinets. I just don't know how each of the frame and panels are connected to each other and how you attach the back panel.
I think a post like this will be perfect as many of your readers, like myself will be building the tool chest which this cabinet would compliment.
I would greatly appreciate some assistance on this as my workshop is truly bare of storage and I have refused to purchase cabinets from the store in hopes I can make them myself.
As always thank you,
B A
Hello Brandon
These cabinets are made from regular construction grade lumber called studs, perhaps scant is the nearest equivalent in the UK. In other words it has knots throughout each piece and there is nothing special at all about the wood. The wood is a softwood and usually a hybrid known in the US as spruce-pine-and-fir (SP&F). Other woods are suitable too. Pine, hemlock, fir, spruce and so on. If you use southern yellow pine, make certain it is dried before further machining. Even then, be prepared for further movement. It’s commonly used, widely available but not necessarily the best choice because of stability. I like it and I would use it. Especially for the main carcass, which is locked in by adjacent components. The doors are another thing. None of the components are longer than 4’ long so cutting studs to shorter lengths or even in half will get the stuff into even a small compact car.
Having said all of that, this is abou the cheapest wood you can get and it will work very well for this.
All of the cupboards follow the same manufacturing procedure comprising frames mortise and tenoned at the corners with plywood panels enclosed in grooves centred in the stiles and rails. The method I use is simple and fast. The outcome is stable, strong and inexpensive.
When I buy the wood it is by no means machined straight and square. Usually it has a higher level of moisture than is suitable for cabinets and so the first step is to get that moisture down to around 7%. I do this by taking it into the workshop, stickering and stacking very spaciously; usually for a month or so if possible. I use a moisture meter for testing moisture content (MC) and cut the lengths of pieces in the center to establish the interior MC. Another alternative way is to weight a couple of marked pieces and check them weekly until there is no further weight loss. This will match equilibrium with the average atmospheric moisture level and should remain acceptably stable both during construction and after completion. Failure to do this will result in some shrinkage that can be repaired later as needed. I would rather acclimate the wood and minimize shrinkage or expansion and other possible movement such as twist.
The back, side and door panels are 1/2” (12-13mm) baltic birch plywood. A good interior grade works fine for this unless you have a damp workshop. then you might consider a water or weatherproof grade.
Almost ever piece of wood can be reworked by hand or machine into a specific finished size. By cutting to near length the wood yields the thicknesses and widths you need. The project is made up of framed panels all around as follows:
2 end panels
1 1/4” x 22” x 36 3/4” framed with plywood panel
2 door panels
1 1/4” x 22” x 31 1/4” framed with plywood panel
1 top
1 1/4” x 23” x 48 1/2” framed with plywood panel
1 bottom
1 1/4” x 19 1/2” x 45” framed with plywood panel
1 shelf
1 1/4” x 17 1/2” x 31 1/4” framed with plywood panel
1 back
1/2” x 33 3/4” x 45” plywood sheet
Each end panel is made from two stiles a top rail and a bottom rail. The stiles and top rail of every panel is made from 1 1/4” x 3” stock. The side bottom rails and the bottom rails of the two doors are 1 1/4” x 4” stock. The cutting list is as follows:
End panel - two
Top rail 2 @ 1 1/4” x 3” x 19” long
Bottom rail 2 @ 1 1/4” x 4” x 19” long
Stile 4 @ 1 1/4” x 3” x 36 3/4” long
Panel 2 @ 1/2” x 17” x 30 3/4” long plywood
Door - two
Top rail 2 @ 1 1/4” x 3” x 19” long
Bottom rail 2 @ 1 1/4” x 4” x 19” long
Stile 4 @ 1 1/4” x 3” x 31 1/4” long
Panel 2 @ 1/2” x 17” x 25 1/4” long plywood
Top - one
End rail 2 @ 1 1/4” x 3” x 20” long
Long rail 2 @ 1 1/4” x 3” x 48 1/2” long
Panel 1 @ 3/4” x 18” x 43 1/2” long plywood
Bottom panel - one
End rail 2 @ 1 1/4” x 3” x 17 1/2” long
Long rail 2 @ 1 1/4” x 3” x 45” long
Panel 1 @ 3/4” x 14 1/2” x 40” long plywood
Shelf panel - one
End rail 2 @ 1 1/4” x 3” x 17 1/2” long
Long rail 2 @ 1 1/4” x 3” x 45” long
Panel 1 @ 3/4” x 12 1/2” x 40” long plywood
Back
Panel 1/2” x 33 3/4” x 45” plywood
Start the panels by milling the stud stock to the finished sizes as shown above. These are dead sizes. It is up to you whether you use machines or do the whole by hand. if you do use hand planes to reduce the stock to 1 1/4”, this is a lot of hand planing, so consider ripping on a saw or planing to thickness using a planer. I like to joint the faces on the jointer and then thickness-plane to thickness. I then surface plane the surfaces with the smoothing plane.
Comments ()