How to Build a Workbench – Gluing Up Aprons and Legs (part2)
NOTE:Just so you know, this is an older workbench series. Paul has a newer Workbench series. If you are interested in the updated version of Paul’s workbench please click the button down below. This page links to a cutting list, tools list, FAQS and much more.
Click here to go to the workbench page
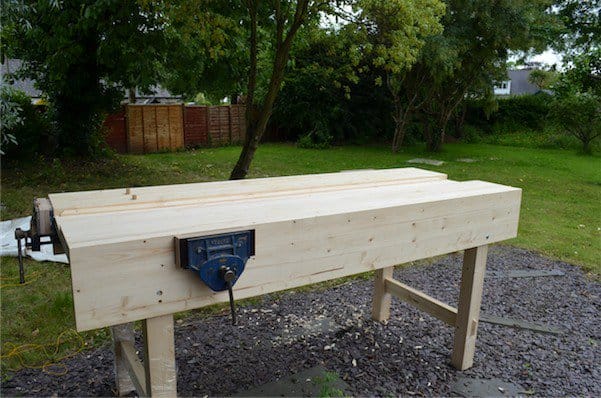
The workbench
This next section is simple and straightforward. Firstly it’s good practice to glue up any laminated parts needed so that when we start the actual construction there is no downtime waiting for glue curing and set up. You may prefer to use solid stock rather than laminated legs and aprons, but I am trying to help those who do not have that luxury. Also, I like laminations. In some cases they are preferable to solid stock.


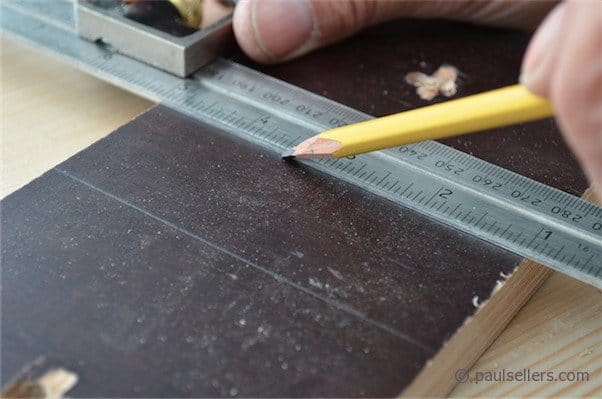
Today I prepped my leg material and glued them up and also planed the edges of 2x4s for the apron pieces. But first I planed the underside of my benchtops dead flat and checked them for being twist free. That’s important as twist in the tops can cause the bench itself to be twisted if it’s not corrected. Having taken down all irregularities with the smoothing plane first, I checked for twist using two 2 ½” battens. I used a crayon to darken one edge. This contrast makes the distant batten easier to sight in. We call these two sticks winding sticks. They guarantee twist free projects of every kind. It’s not necessary to plane the top side of the bench tops. We do this when the bench is finally together.
On the legs

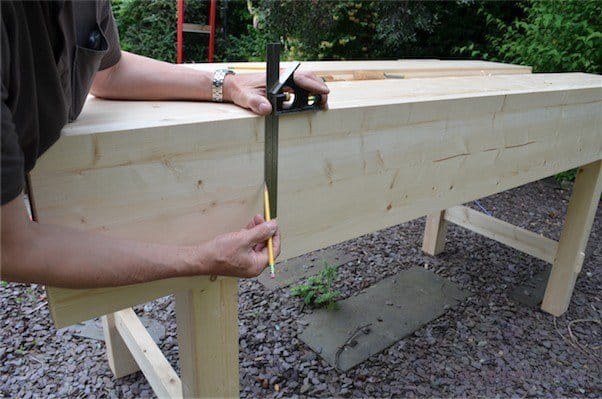
It’s practical to cut the leg pieces to length first. This minimizes common defects such as bow and twist and therefore wastage on truing up stock. As my bench will be 38” tall when completed, I deduct the thickness of the benchtop plus 1 ¼” for the bearer that anchors the benchtops and well to the leg frames, so the overall length will be 34”. I cut my stock one inch longer. After the pieces are glued, I can cut the legs to length by removing ½” from each each end when the glue has dried.

I simply hand planed the two glue faces so that they were smooth and free from planer marks and any other snags that might prevent perfect adhesion over the whole of the surfaces. I am not aiming for perfectly straight stock so much as to ensure that they will glue well when together. As a general rule, if I can squeeze two sections of stock together using only hand and arm pressure then I know that glue will hold it. In this case I chose my stock carefully to minimize any possibility of twist, cup and bow and though I couldn’t guarantee perfection, I did find some nice flat and straight stock.
It is not necessary to square any edges at this point. We will plane the stock square later and that means planning the first face and then the adjoining faces as needed. Above, I am planing the one wide face of the wood with my #4 ½. A #4 will work equally well. Now I have glued all of my legs using the same clamps, but you can also clamp them individually if you feel more comfortable doing that. I am simply economising on clamp usage. I glued up the intermediate faces and left the others unglued. That way, when I separate the legs, I will have four laminated legs measuring about 3 ¾” by 3 7/8”. Close enough not to be of concern.
Note:
The size of the legs is not too critical and it may well be more a visual aesthetic as much as anything. I think legs need to look as though they uncompromisingly support the mass of the bench so 3” and up looks best. Fact is that a smaller section will indeed support the bench but might look too weak. On the other hand a lighter, shorter bench can look silly with massive legs. Just my thoughts really. Change sizes to suit your personal preference.
For those in the US, US 2x4s work fine even though they have rounded corners and not square. They will plane down square and without V’s in a few minutes of hand planing with a good sharp #4 or 4 1/2 . You should be able to buy SYP knot free as SYP pine studs that will work. That will give you a 3x3 ½ leg which is ample.


Gluing follows the same pattern as we used for the main laminated bench top sections. I zigzag the glue and rub-joint them together to expel air and distribute the glue evenly inside. In this case I stacked them up and then placed them in clamps. I even out the distribution of clamps starting with outer clamps and working toward the centre clamp.

Clamping from both sides evens out the pressure and ensures I get the good even pressure I need for perfect lamination. There is no glue between the second and third and fourth and fifth and sixth and seventh pieces remember.
The aprons and well board

I have used three pieces for laminating the aprons and as my stock is almost 4” after planing the edges I will end up with 12” aprons and a 12” well board. The aprons can be as narrow as 9” but no less and as wide as 12” is amply sufficient, both in strength and appearance. I used my laminated benchtop piece as a temporary bench and pushed the apron sections up against the tree to plane as before. We usually call this process jointing. You can improvise as need be and if necessary get down on your knees and plane on the ground. Soon you will have a bench to stand up to and work from. I am using a #4 ½ Stanley smoothing plane, which works well, but a #4 works as well and you need no other. At the risk of being criticised, most will recommend straightening the edges with a longer plane and that’s fine if you have one, but in my view it’s not so necessary as simply squaring and smoothing for our purpose. Get as continuous a shaving as you can with each swipe and check along the length for square as you go. The closer to square the better. You need only plane joining edges at this stage.

Zizag the glue evenly and get used to this. It’s quick and efficient and works well for everything. I have glued up each apron and well board individually, but you can also gang them up and use the same amount of clamps. Gluing narrower multi-component laminations requires even compression using clamps from both sides. When we glued the legs we need even pressure to even out the glue from both sides. In the case of the aprons and well board, we clamp to even out the glue and to prevent the boards from bulging into a camber.

Remember that it's good practice to remove excess glue squeeze out from between each of the joints as this ensures that the glue dries more readily
Comments ()